Placing geo-coordinates on an image
- ruby
- geocoding
One recent project I’ve been working on involves dropping pins on a map of the world at locations that correspond to Google geolocation (longitude/latitude) coordinates. This seemed like a simple problem that I could find a thousand and one tutorials for, but turned out to be rather tricky - and I never did find a clear explanation of the process anywhere. So here’s a (hopefully) straightforward method for converting Google geo coordinates to pixel locations on a map image.
Input data
We have a large set of location data that has been geocoded from postal code and country to Google-provided longitude and latitude using Geokit:
include GeoKit::Geocoders

location = GoogleGeocoder.geocode("90210, US")
google_latitude = location.lat
google_longitude = location.lng
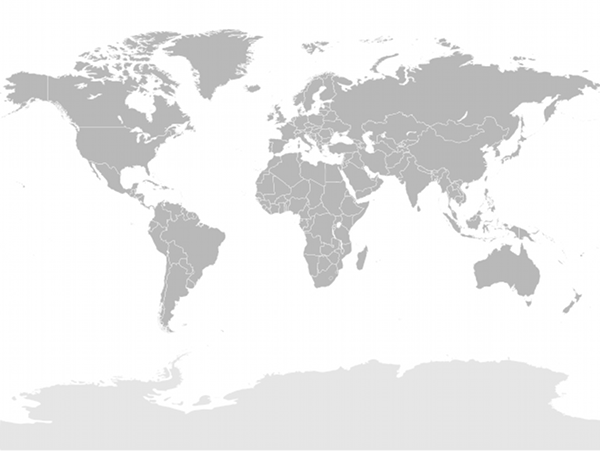
We also have a world map image. Wikimedia Commons has quite a few blank world maps - the key is that we need to know what projection was used to make our map. Fortunately, a number of the maps on Wikimedia Commons list what projection was used, so in this case we have a map that was made using a “Miller cylindrical projection”:
Projections
It turns out that longitude and latitude aren’t quite as universal as I thought before starting this project. Turning a location on the earth into a pair of numbers depends on the projection used to map the surface of the earth onto a flat plane. Google uses a particular projection to do this - and I would imagine each provider you can use with Geokit has their own special projection, different in some important (to those who know about GIS) or arbitrary (to someone like me who hasn’t got a clue about GIS) way from any of the others. Well, whatever - this is where the Proj.4 library comes in.
Proj.4 is a library that can convert between different projection systems - where each projection system can be described by a Proj.4 configuration string - there’s even a massive directory that includes these Proj.4 configuration strings for each projection system. Since we have our longitude and latitude in Google’s projection system, we are going to use Proj.4 to translate to the Miller projection that matches our map image.
There’s a gem, of course: proj4rb:
If you are installing this on OS X, you’ll need to port install proj, and you will likely need to install
the gem manually with: gem install proj4rb -- --with-proj-dir=/opt/local/var/macports/software/proj/4.7.0_0/opt/local/
On debian-based systems, apt-get install proj and gem install proj4rb (or bundle install, etc) will get you there.
require 'proj4'
First, we need the Proj.4 parameters for Google’s projection. Spatial Reference has us covered, just click the Proj4 link
on this page,
and you’ll see the params we need:
google_params = "+proj=merc +a=6378137 +b=6378137 +lat_ts=0.0 +lon_0=0.0 " +
                "+x_0=0.0 +y_0=0 +k=1.0 +units=m +nadgrids=@null +no_defs"
google_projection = Proj4::Projection.new(google_params)
We are converting to a Miller cylindrical projection, so we’ll create an object for our target projection as well:
miller_params = "+proj=mill +lat_0=0 +lon_0=0 +x_0=0 +y_0=0 +R_A " +
                "+ellps=WGS84 +datum=WGS84 +units=m +no_defs"
miller_projection = Proj4::Projection.new(miller_params)
Now we can convert our Google longitude and latitude to a Miller longitude and latitude:
google_location = Proj4::Point.new(
    google_longitude * DEGREES_TO_RADIANS,
    google_latitude * DEGREES_TO_RADIANS)

miller_location = google_projection.transform(miller_projection, google_location)
We’re almost there - just one more step and we can start dropping our pins on the map…
On to the pixels!
The last step is to convert our Miller projection based longitude and latitude to actual pixel positions on our map. I believe there may be a way to do this with Proj.4, but I had some trouble finding it, and it turns out it isn’t so hard - but we need to know a couple pieces of information:
  # This is the size of the globe in the image, typically the width
  # (in most projections, the height can be derived from the width).
  IMAGE_GLOBE_SIZE = 1000.0

  # These are where the center of the globe is on the image - all
  # lat/long coordinates are relative to this point
  IMAGE_GLOBE_CENTER_X = 473.0
  IMAGE_GLOBE_CENTER_Y = 366.0

  # Assuming that our image wraps all the way around the globe, this
  # describes the conversion betwen spherical unit and pixel units
  RADIANS_TO_PIXELS = IMAGE_GLOBE_SIZE / (2.0 * Math::PI)
If you were lucky, the center point of the map image you are using may have been listed along with its projection system (typically it is in the ocean just south of the western part of Africa) - in this case I used some trial and error to adjust it by a few pixels so a sampling of cities around the world showed up in the correct spots.
Armed with these constants describing the world map image we picked, we can do our final conversion (thanks to some random C# code):
  # Convert the long/lat that are in the correct projection to pixel
  # coordinates on the image, where 0,0 is the upper left of the image
  def convert_to_pixels(long, lat)
    x = IMAGE_GLOBE_CENTER_X + (long * RADIANS_TO_PIXELS)
    f = [ [ Math.sin(lat), -0.9999 ].max, 0.9999 ].min
    y = IMAGE_GLOBE_CENTER_Y +
      (0.5 * Math.log((1.0 + f) / (1.0 - f)) * -RADIANS_TO_PIXELS)

    { :x => x.to_i, :y => y.to_i }
  end
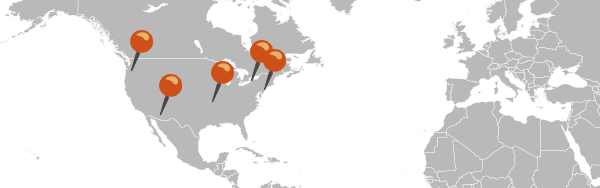
There we have it - a pretty simple process, all told - and we can now place our pins on the map. Here’s an example of this in action.